June 2 , 2008
After working through this guide you will have covered the basic steps to modernize any inspection process. The four basic steps are:
a. Design an inspection form online
b. Setup an organization to manage it's inspection data electronically
c. Perform an inspection
d. Generate reports in multiple formats
Following is a general timeline for what you can expect. Our goal is to provide an easy to setup, easy to use system for modernizing your inspection system. After completing the "90 Minute Up and Running Challenge" you will have:
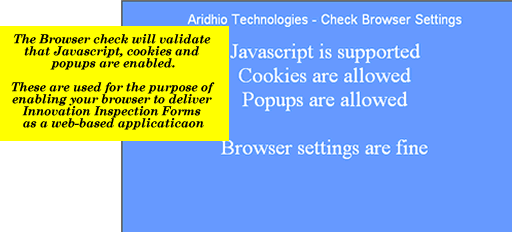
1. Verified that your browser is configured to run our web-based Forms Designer application (00:10 minutes)
2. Had a chance to "kick the tires" to see how the forms design application works (00:20 minutes)
3. Setup a Forms Designer account (00:25 minutes)
4. Designed a simple form (00:50 minutes)
5. Setup an Organization Account (00:60 minutes)
6. Download the device software and setup an inspector (00:70 minutes)
7. Performed a mock inspection and submited the results (00:80 minutes)
8. Generated a Report (00:90 minutes)
Congratulations! You will have set your organization down the path to modernizing its inspection process!
Figure 1
Your browser should now be appropriately configured. Lets kick the tires for a few minutes to get the hang of creating textfields, drop down lists, etc, and moving these items around on the design canvas. None of what you create or modify during this step will be saved. So you don't need to spend too much time making elaborate forms at this particular point. That will come later. Here in Section 2, let's spend about 10 minutes getting famliar with the design window. You will get detailed information for working with the design canvas in Section 4. On the design canvas, popups will appear prompting you for design preferences at various points. To ensure that these popups are not hidden behind other application windows, it is a good idea to minimize or close other application windows. Clicking here will open a design window.
Once you are in the Forms Designer application, you will start with an empty Design Canvas. From here you could load a design that you or a colleague had previously started or one from the publicly available list.
Here we will start a new form, which we do by clicking on the "Start a New Form" image on the left-hand side of the screen, in the Control Selection Panel.
You will be prompted for a name for this form. This is just a test at this point and your form will not be saved so enter "anyform" and select OK.
![]()
Figure 2
From the palette on the left-hand side of the screen, you can select between drop down lists, textfields, labels, radio group boxes and checkboxes.
When a dropdown list or a textfield is selected, a label is automatically created as well.
A popup window is displayed when a dropdown list or a radiobutton group box is selected. A variable number of options can be entered into the popup window.
Over the next few minutes, we will wall through a few controls. Start by selecting a Text Input control.
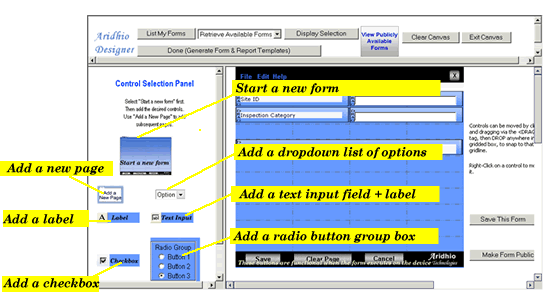
Figure 3
Once a control has been created, it can be edited by right-clicking on its border and making the desired changes in an edit box that comes up.
By default, two columns are created and each created control (drop down list, checkbox, etc), will cover half of a row on the canvas. Any control can be modified to fit in 1/4th the width of a row, 1/2 the width of a row, 3/4th the width of a row or a full row (editing is covered in the next section).
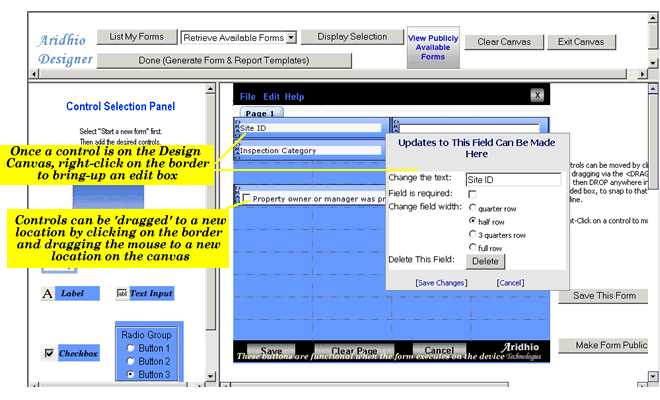
Figure 4
Add a Radio Groupbox from the Control Selection Panel, Figure 3.
Radio group boxes works fine for selecting one of a few choices where each option is visible. For this control, you will be presented with a popup window to enter in the desired values.
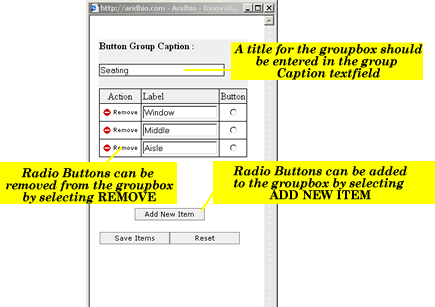
Figure 5
Select Option from the Control Selection Panel, Figure 3.
Dropdown list controls are a good way to conserve screen real estate especially when many options are provided. For this control, you will be presented with a popup window to enter in the desired values.
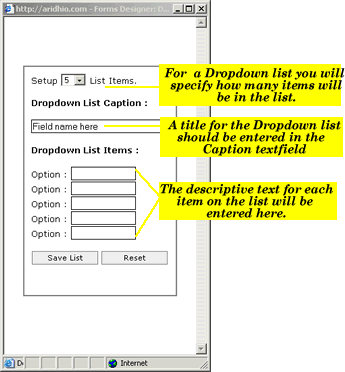
Figure 6
When adding controls, they are auto-dropped onto the canvas at an "approximate location". In this case, you should move this recently added control to some place on the canvas below the previously added control. Click on the DRAG tag on use your mouse to move then control to another grid-cell then release it. You only need to place the control somewhere in the new grid-cell and the control will "snap" into place when you release it.
Feel free to drag any control around the design canvas to different locations.
For controls that have sepearate labels, always position the label before the control to make reporting more intuitive.
This is just practice, so when done, just close this window and we will start setting up the necessary accounts.
With your browser configured and a few minutes of getting familiar with the design canvas, we are now ready to register in the Forms Designer part of the application. This will setup an account for you to design and save your forms. Later, you can allow access for your colleagues to collaborate with you if you like, by making them members of one or more groups that you will create. Register now.
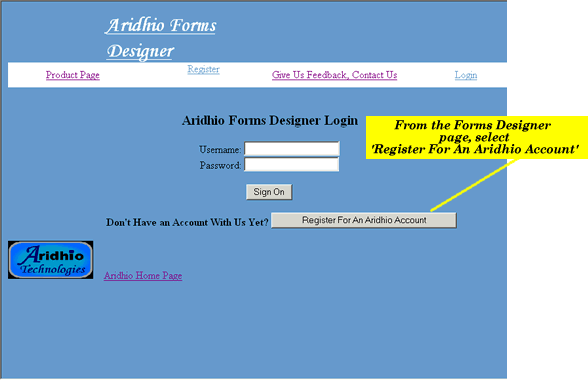
Figure 7
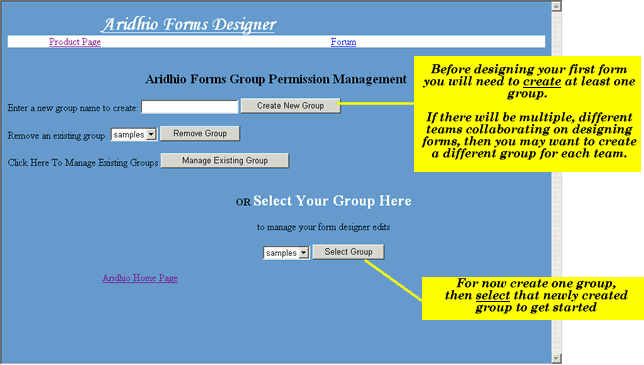
Figure 8
A group name has to be universally unique so it is recommended that you use something like:
MyOrganization SomeGroup
or
MyOrganization MyDivision SomeGroup
for your GroupName.
We are ready to start designing our first form. This will be a simple form that walks through the major components that you will need to design your own forms. You will create a multiple-page form, adding at least one of each type of control. You will edit text labels, add items to a drop-down list, create a box with multiple buttons, drag controls around on the design canvas, and change the size of a control.
After you have selected a group in the previous step, you will be brought to the page shown in Figure 9. Select CREATE OR MODIFY FORM.
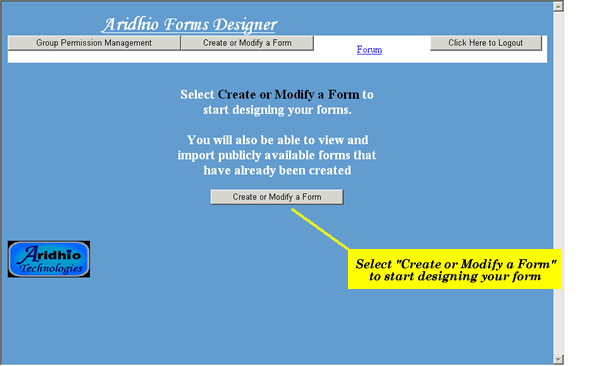
Figure 9
On the left hand sife of the design canvas, Figure 10, Select "Start a New Form". You will be prompted for a name for this Form Template. Enter: firstForm
Select Text Input from the Control Selection Panel on the left hand side of the design canvas. When selecting Text Input Controls, labels for the text fields are automatically created to the left of the text input field.
Select Text Input again to add a second label-textfield pair.
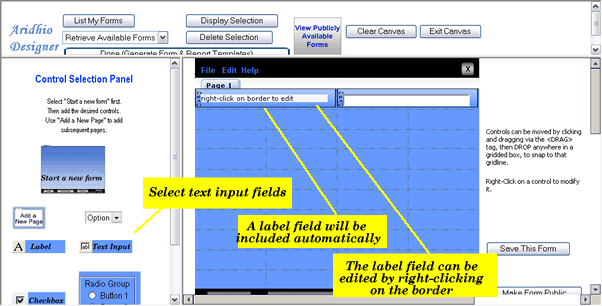
Figure 10
In this step, we will edit the labels. This is done by right-clicking on the border for the controls. For the first lets enter: Site ID in the first "Change the text" field and the Street Address for the second one.
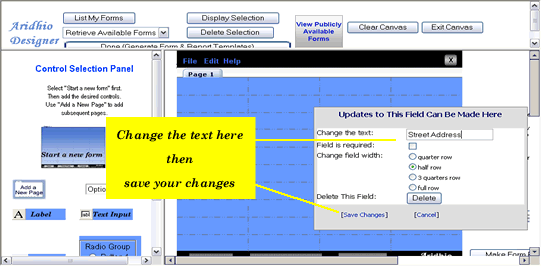
Figure 11
Next, Select Radio Group from the control panel on the left-hand side. You will see a popup window similar to Figure 12 below. Enter: Inspection Type under Button Group Caption: . Add three options, Routine, Requested, and Re-inspection.

Figure 12
Select "Add a New Page" from the Control Selection Panel.
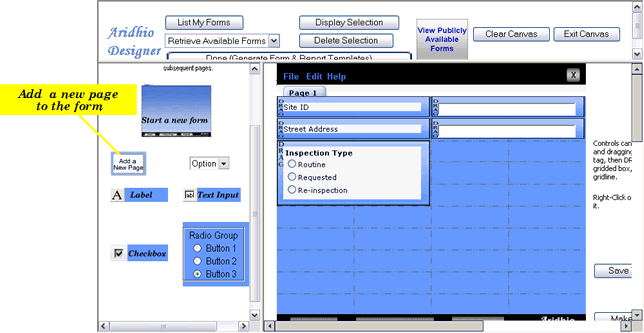
Figure 13
The New page will be blank, Figure 14.
![]()
Figure 14
Select Option from the Control Selection Panel. Select 4 for the number of list items, Figure 15. For the Dropdown List Caption, Enter: overall assessment . For the labels for the four items in the list, enter:
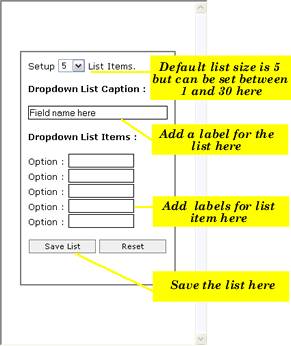
Figure 15
Next, select a checkbox from the Control Selection Panel, then repeat and select a second one.
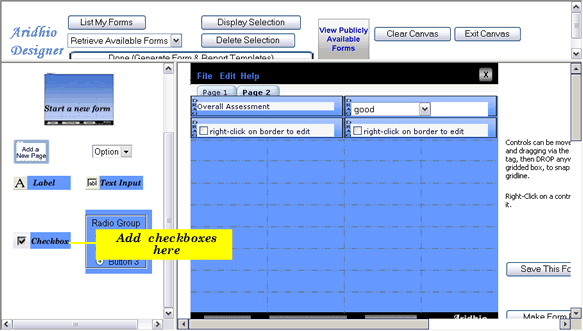
Figure 16
Drag one of the checkboxes to the row beneath the first, Figure 17. To do this, click on the DRAG part of the control's border, and using your mouse, drag it to the cell beneath the first checkbox and release. You can release it anywhere in that cell and the control will "snap" into place.
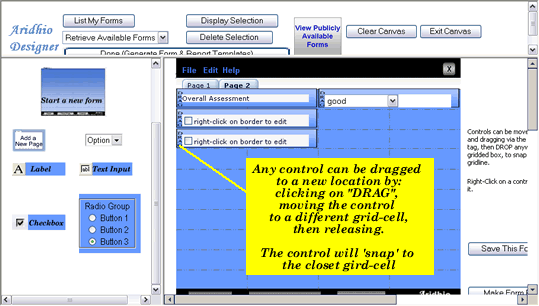
Figure 17
Now we will edit the two checkboxes. For the first, right-click on the border and
a. edit the text to say something like "obstructions compromised inspection"
b. beside "Change Field Width", select "3-quarters row", Figure 18.
c. select "Save Changes"
Repeat for the second checkbox but use different text, something like "owner or principal was present"
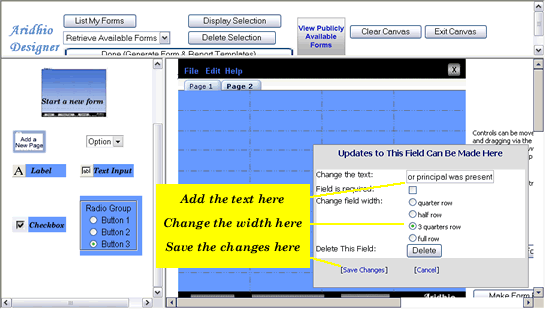
Figure 18
Once you finish a design session, be sure and select "Save Form". You can load the form and continue to work on it at a later time.
Once you are completely done designing your form, you will need to select "Done (Generate Form and Report Templates)". Depending on the settings for your browser size, you may have to scroll down on the frame in the window or readjust the size of the window/frames in order to see the button.
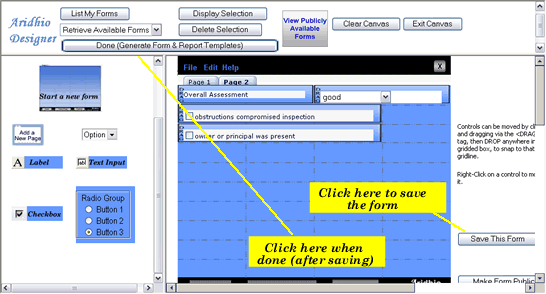
Figure 19
After Selecting "Done (Generate Form and Report Templates)", you will be prompted for the title that you want to apper on your report. For now, you can enter something like "Our First Form" or whatever else you like.
This is were a quite bit happens to make an end-to-end system possible. This step will generate a software version of the Form Template that can be downloaded to a laptop or Tablet PC, allowing inspectors to work even if they are disconnected. This also generates the reporting template that analyst will use when viewing the results of submitted Form Instances.
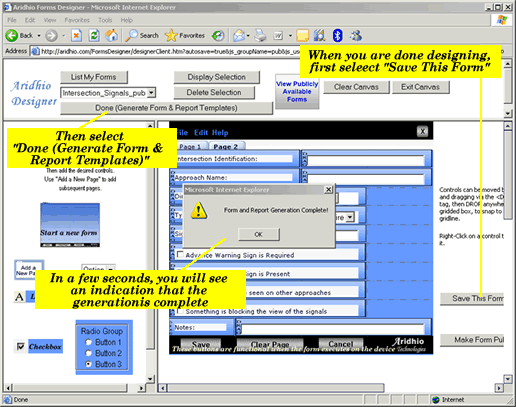
Figure 20
In order for an organization to use inspection forms, an organization account will have to be created. If you are wondering why you have to create one account for Forms Designers and a separate account for the Analysts, you can take a look at "Why do I need to create separate accounts?" .
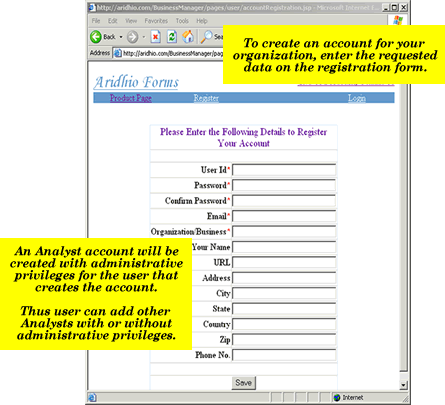
Figure 21
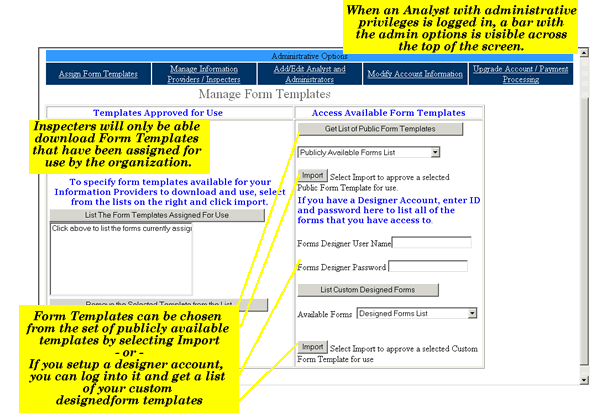
Figure 22
In order for inspectors to download Form Templates and submit Form Instances, they must first be added to the organization's list of "information providers". From the darker bar across the top of the window. Click on the link labeled Manage Information Providers / Inspectors. Minimally, you will add a username, for each inspector and an account ID will be generated. At the time that the organization was created, an organization code or "OrgCode" was generated. You will need to provide to each inspector, their username (you can just use their internal email address), the OrgCode, and their AccountID. The inspectors will need this information to configure their devices. You can also see these values if you bring up the "Manage Information Providers / Inspectors" screen.
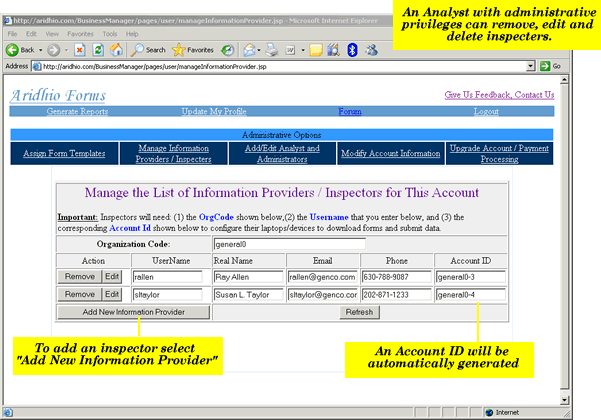
Figure 23
From the screen to manage information providers, selecting the button to "Add New Information Provider" will display a box to add in the details for the inspector / information provider, Figure 24.
Important: Write down the Orgcode, UserName and AccountId now.
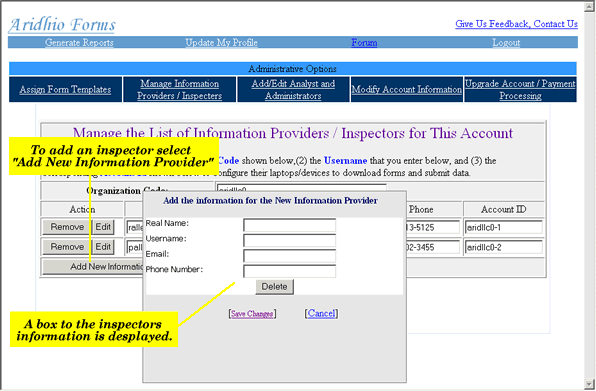
Figure 24
Now we are ready to move on to the role of Inspector. For the purposes of working our way through the "90 Minute Up and Running Challenge", will use any Windows computer even if it is the desktop that you may already be working on for the previous parts of this exercise.
The next step is to download, install, and configure the client software used by the inspector. The software can be downloaded here.
Information providers (inspectors) may work in areas where there is not good wireless reception. The Innovative Inspection Forms solution does not require connectivity to collect inspection data. For the client device used by the Information Providers, internet connectivity is only needed to download the initial client software (or updates), new templates to collect data on, and to submit collected data.
The device application can be downloaded from the Aridhio Technologies website. Security Warnings indicating "Unknown Publisher" during the installation of the client software running on the device can be safely ignored.
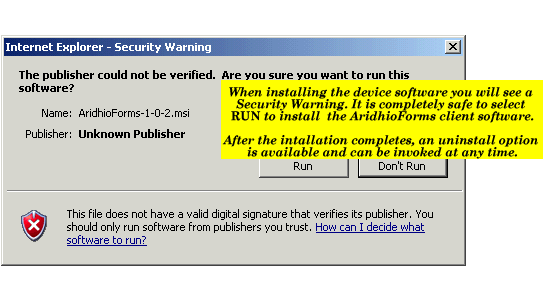
Figure 25
Once the installation is complete, the AridhioForms device application can be accessed on your Windows XP or Vista device by selecting START -> PROGRAMS -> ARIDHIO (folder) -> ARIDHIO (application)
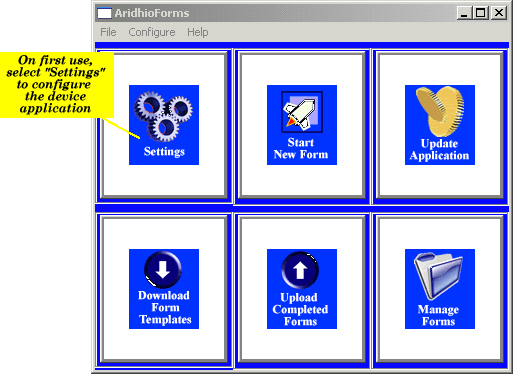
Figure 26
Here you will need the username, orgcode and AccountId saved after section 5.4
You should only configure proxy settings if you have to. If you are not sure, check the advanced settings on your browser to see if a proxy server is configured. If so, you can use those same settings from your browser here. If your browser does not configure a proxy server then you will not need to configure one here either.
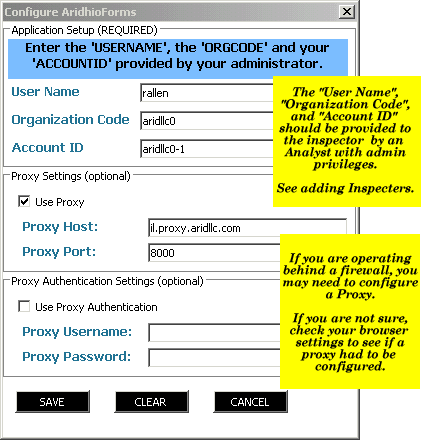
Figure 27
With our device configured, we now want to download a Form Template, enter in some values and save the data (create a Form Instance), then submit that Form Instance back to the server. Now we will perform a mock inspection to collect data.
In this step, we download the Form Template that we created in the Forms Designer application and assigned for use the Analyst Pages. With the device application open, select "Download Form Templates" icon , Figure 26, then select the Download Templates button near the bottom of the application screen, Figure 28.
You will be presented with a list of available Form Templates after the application connects to the Aridhio servers. Se lect the Form Template that was created in earlier in this exercise. If this is your first time going through this exercise, there will be only one choice.
If you seem to be having trouble connecting to the Aridhio servers, verify whether or not you need to configure a proxy server. Looking at the advanced options in your browser, you can see if a proxy server is configured or not. If you do need to configure a proxy server then go back to the settings as shown in Figure 26 and Figure 27.
You may have to hit "Refresh", Figure 28, to see the newly downloaded Form Template.

Figure 28
To start a new Form Instance, double click on the Form Template and the form that was designed from the web-application will be visible, Figure 29.
For the purposes of this exercise, it is not important what values you enter on the form but do populate Page 1, then click on Page 2, and populate it is well.
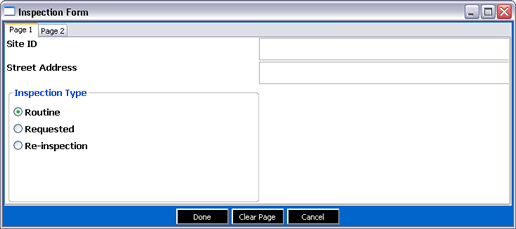
Figure 29
Once you done, select "Done" at the bottom of the forn. You will be prompted for a name for this Form Instance that should be uniquely meaningful to you; reference to the inspection site and date, for example.
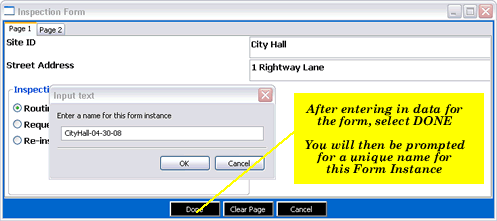
Figure 30
To submit the results to the Aridhio servers for processing, you now need to select submit, bottom of Figure 28. This will bring up a window, Figure 31, from which you should select the Form Instance that you just completed.
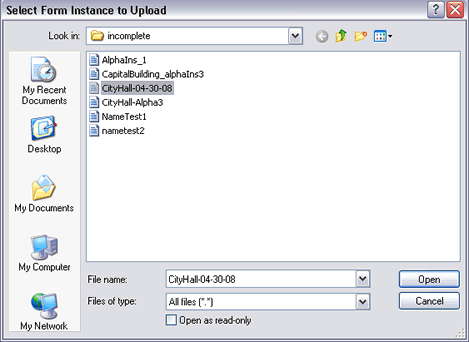
Figure 31
The following steps will guide us through generating reports for the data that was submitted during our mock inspection in the previous section. We will generate two types or reports in this section. A PDF formated report that we could print out, and a report with the data imported into a Microsoft Excel document.
Reports can be generated from submitted Form Instances. Reports are generated for one Form Template at a time. The Report can be filtered for which submissions of Form Instances are included in the output.

Figure 32
A number of different formats are available for generating reports: PDF, rich text format (RTF), plain text, Excel, and comma separated values (CSV).
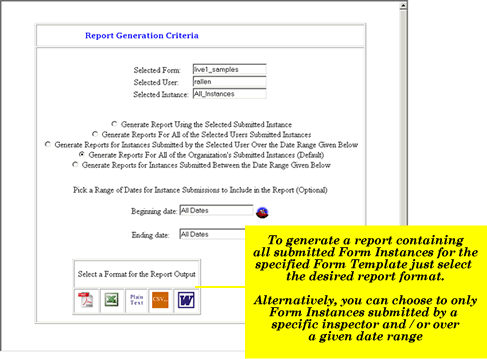
Figure 33
Below is an example of the generated report in PDF format.
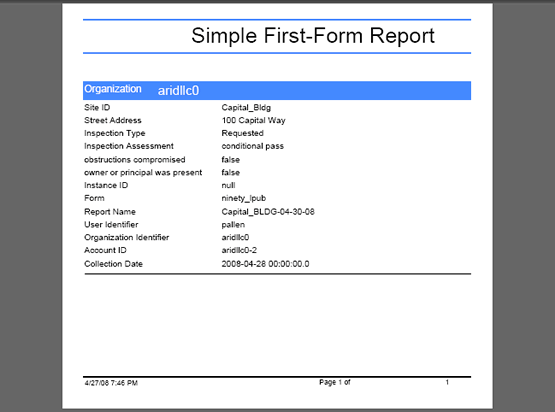
Figure 34
Below is an example of the generated report imported into a Microsoft Excel document.
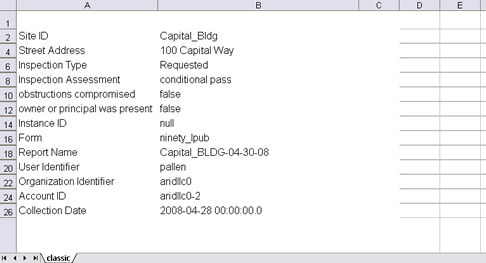
Figure 35